Experiment 5 - Controlling Motors
| Home | Order | Let me know what you think |
More current is needed for things such as motors, relays and solenoids. Even a small motor draws more current than the PPI or a small transistor can provide. A power device is called for.
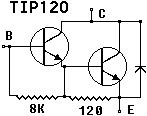
One such device is the TIP120, a darlington transistor (seeTIP120.PDF):
A darlington is actually two transistors. Notice that the emitter of the first transistor is connected to the base of the second. That causes their current gains to be multiplied, giving the TIP120 an hfe of about 1000. The base to emitter resistors are built into the package.
The TO-220 package has a metal tab with a hole in it which can be
used to bolt the TIP120 to a piece of metal called a heat sink, used to
pull heat away from the package. The tab is connected to the collectors
of the transistors though, so if the heat sink is grounded the tab must
be insulated from the heat sink but still conduct heat to it. That's
accomplished with special materials made for the job. A heat sink is not
needed for this experiment. Notice that the positions of the Base,
Collector and Emitter are not the same as they were on the PN2222. The
diode connected from collector to emitter will be discussed shortly.

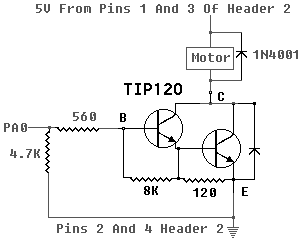
Let's say we want to power an electric motor that needs about 1 Amp,
such as the Radio Shack 273-223. With a current gain of 1000, we need
only drive the base with 1ma (1ma * 1000 = 1A). The full 2.5ma
capability of the 82C55 will be used however, in order to make certain
plenty of current is delivered to the motor. The voltage between the
base and emitter is about two diode drops, or about 1.4V. If we say we
can provide 3V, our resistor has 3 - 1.4 = 1.6V across it. The value of
the resistor would then be:
R = V/I = 1.6/2.5ma = 640
The closest standard value is 620 ohms, but 560 ohms is easier to
find.
The power is: P = 1.62/560 = 4.57mw so any normal rating is OK.
Re-calculate the current:
I = V/R = 1.6/560 = 2.857ma plus a little
This circuit should deliver the full 2.5ma to the base of the the TIP120. That times 1000 is 2.5 amps. The TIP120 is being asked to provide only half of its maximum 5 amps current. A 4.7K pulldown resistor from the output of the PPI to ground is added to make certain the PPI line goes low when it's supposed to:
NOTE: Please be sure to read the Warranty And Disclaimer before working with the hardware!
A short discussion of magnetism and motors will be helpful to explain the need for the diodes in the circuit. Incidentally, diodes such as these handle high powers and are usually called rectifiers. A 1N4001 for example, can handle 1 amp at 50V or 50W (although I wouldn't advise pushing one that hard), compared to the 1N4148, which is rated at only about 500mw maximum.
Just about everybody played with magnets in grade school. From that experience it was discovered that opposite poles of magnets attract and like poles repel. We were told later that an electromagnet could be formed by running electrical current through a wire wrapped around a piece of iron. By using a direct current, such as that from a battery or the 5V power supply of a computer, the piece of iron will have fixed North and South poles just like a permanent magnet. It will be attracted to and repelled from a permanent magnet in the same manner as another permanent magnet. A motor can be constructed using that knowledge.
I will cover only the basic ideas of motor operation here. A more detailed explanation can be found in How Stuff Works. Notice what will happen when an electromagnet is placed inside a permanent magnet (wrap the fingers of your left hand around the electromagnet in the direction of the current and your thumb will point to North). The electromagnet is mounted on an imaginary shaft to allow it to rotate:
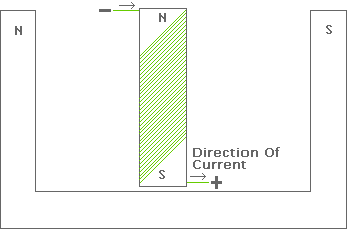
The opposite poles will attract, and the like poles will repel, so the electromagnet will rotate:
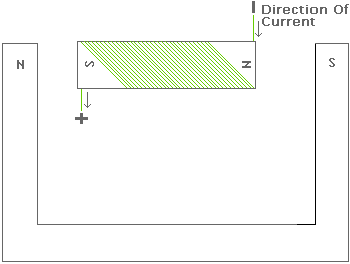
Now turn off the power long enough to let the electromagnet coast a little, then turn it back on, but with the polarity reversed. The whole process starts over:

The rotating electromagnet is called the armature. The switch used to reverse polarity is formed by brushes which connect to the coil by sliding over curved pieces of metal. Together the curved pieces of metal are called the commutator. They are bonded to an insulator on the shaft going through the armature.
In addition to producing mechanical movement, magnetism can also produce voltage. If a wire moves at right angles through a magnetic field or a magnetic field moves across a wire, a voltage will be produced in the wire. The magnitude of the voltage depends on the velocity of the wire or field, among other things. A magnet is formed when voltage is applied to the motor. A magnetic field exists around the armature just as it would around a permanent magnet. When the voltage is turned off, the magnetic field rapidly collapses. Since the field collapses in the opposite direction from which it was initiated, the voltage is reversed. It can be quite high compared to the powering voltage; enough to damage components connected to it.
We are providing one side of the motor with 5 volts. The TIP120 will take the other side near ground (actually about 1 volt above ground). Note that the 1N4001 will be reverse biased when the motor is turned on since its cathode is more positive than its anode. (Forgot about cathodes and anodes? See How To Read A Schematic.)
A relatively large voltage spike of short duration will occur when the motor is turned off that is opposite in polarity to the applied voltage. The TIP120 side will be significantly more positive than the 5V side. This will forward bias the 1N4001 which will short out the spike, protecting the TIP120 and other circuitry. I measured peaks as high as 100 volts across the Radio Shack motor. Please do not leave out spike protection rectifiers! The diode that is built into the TIP120 also helps by shorting negative spikes to ground. Another term for voltage is Electromotive Force or EMF. The large reverse voltage spike seen when power is removed from a coil is often called Back EMF.
Now add the following to the bottom of digital.c:
void motor(long on, long off)
{
  int x;
  long y,z;

  printf("ON  ");
  outp(ppi_porta, 0xff);
  for(y=0L; y<on; y++);

  printf("OFF ");
  outp(ppi_porta, 0);
  for(z=0L; z<off; z++);
}

// turn port a on
void portaon(void)
{
  outp(ppi_porta, 0xff);
}

// turn port a off
void portaoff(void)
{
  outp(ppi_porta, 0);
}

// set up the ppi according to the dictates of the mode argument
void set_up_ppi(int mode)
{
  unsigned control = base + 0x23;
  int command;

  mode>>=6; // shift the mode value to the right 6 places

  command = (mode & 0x0c) << 1; // shift bits 2 and 3 into positions 4 and 5
  command += (mode & 3); // add in bits 0 and 2
  command |= 0x80; // OR in bit 7 for PPI set up

  outp(control, command); // set according to mode command

} // end set_up_ppi()

// end digi5a.c
|
The motor(..) function turns the motor on then off for the counts you send it. The functions portaon() and portaoff() turn Port A on and off. The set_up_ppi(..) function works the same as before except that it now accepts the new enumeration values as inputs, so it shifts the mode value right 6 places as required.
Now try the following to test it:
// experi5a.c

#include <conio.h>
#include <stdio.h>
#include <bios.h>

// include header with constants
#include "const5a.h"

// include header with external declarations
#include "extern5a.h"

void main(void)
{
  int x,y,r,c;

  get_port(); // get the port number and establish register locations

  // make A an output and B and C inputs
  set_up_ppi(Aout_CUin_Bin_CLin); // uses the new enumeration

  while(!kbhit()) // stay in loop until key is hit
  {
    motor(1000000L, 1000000L); // motor on, off times
  } // end while(!kbhit())

  portaoff();

} // end experi5a.c
|
Notice the change in the while() loop. It works just like the previous loops that have been used, except that the test for a pressed key is now part of the while() function.
The extern5a.h file contains the external declarations:
// external prototypes extern void set_up_ppi(int mode); extern void get_port(void); extern int is_closure(int closurenumber); extern void motor(long on, long off); extern void portaoff(void); extern void portaon(void); |
The const5a.h file contains the new PPI setup enumeration from
Experiment 4 .
Click here to download constant.h
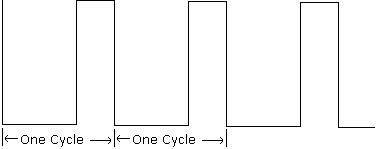
Back to childhood (nice place). Did you ever turn a bicycle upside-down and spin its wheels? If not, go outside and do it; we'll wait. It's right up there with mud puddles -- well close, anyway. Most kids spin the wheel by slapping it. The more slaps per unit of time, the faster it turns. Also, the longer the hand is in contact with the tire, the faster it turns. This is how something called Pulse Width Modulation (PWM) works. Pulsing the motor with the full voltage and current produces the same magnetic force in the armature, but for a shorter time. Thus, the force provided by the motor is about the same. Hit the tire or pulse the motor only half the time however, and the average voltage is cut in half. The motor will turn at half its full-voltage speed but still supply the same force. The signal to the TIP120 from the PPI would look something like this for a 50% duty cycle, which is to say it's on half of the time:

The motor will run at half its normal speed, providing the pulses are fast enough to take advantage of the motor's moving inertia. If you try to slow the shaft down with your fingers however, you will find that the motor has about the same force (torque) as it does at full speed.
Here's another one. If the transistor is on for 30% of a cycle, the duty cycle is 30% and the motor will run at about 30% of its full speed:
Now add this at the bottom of the digital C module:
void motor2(long on, long off)
{
  int x;
  long y,z;

  outp(ppi_porta, 0xff);
  for(y=0L; y<on; y++);

  outp(ppi_porta, 0);
  for(z=0L; z<off; z++);
}
|
Notice it's the same as motor(..), but without the print statements. Now put this in something called experi5b.c:
// experi5b.c

#include <conio.h>
#include <stdio.h>
#include <bios.h>

// include header with constants
#include "const5a.h"

// include header with external declarations
#include "extern5a.h"

void main(void)
{
  long on,off=5000L,r,c;

  get_port(); // get the port number and establish register locations

  // make A an output and B and C inputs
  set_up_ppi(Aout_CUin_Bin_CLin); // uses the new enumeration

  while(1) // stay in loop forever
  {
    for(on=1000L; on<=10000L; on+=100L)
    {
      // "keyboard hit" is a function that checks
      // to see if a key has been pressed.
      if(kbhit())
        break;// A key was pressed -- break out of the loop
      printf("on=%5ld off=%5ld total = %12.6f -- on = %9.6f percent of total\n"
      ,on,off,(double)on+(double)off,100.0*((double)on/((double)on+(double)off)));
      motor(on, off);
    }
    if(on<10000L)
      break;// A key was pressed -- break out of the loop

    for(on=10000L; on>1000L; on-=100L)
    {
      // "keyboard hit" is a function that checks
      // to see if a key has been pressed.
      if(kbhit())
        break;// A key was pressed -- break out of the loop
      printf("on=%5ld off=%5ld total = %12.6f -- on = %9.6f percent of total\n"
      ,on,off,(double)on+(double)off,100.0*((double)on/((double)on+(double)off)));
      motor(on, off);
    }
    if(on>1000L)
      break;// A key was pressed -- break out of the loop

  } // end while(1)

  portaoff();

} // end experi5b.c
|
Notice the calls to printf(..) above. The %5ld parts print the long decimal numbers a minimum of 5 characters wide. Note also the references to double. A double is a floating point number -- a number with a decimal that can change position according to need. The term (double)on is what is called a cast. It forces the on variable to look like a double so floating point calculations can be performed with it. Casting to double is used because decimal fractions are needed to show the percent of total time. Here, it's percent = 100*(on/(on + off)). Since the on and off variables are longs, they are cast to doubles to do the calculations.
The basic formatting string in printf() for floating point is %f. If there is a number after the %, it says to print a minimum of that many digits, or spaces if there are not that many. If there is then a decimal and a number after the decimal, the number indicates the precision -- the number of places to print after the decimal place. Thus, %12.6f means print a floating point number using a minimum of 12 places, and 6 digits precision to the right of the decimal place.
You might need to play around with the numbers a little to get the motor to work right. Again, a lot depends on the speed of your computer. That problem will be handled in the next experiment. For now, the off time has been fixed at 5000. The on time is first varied from 1000 through 10000 in steps of 100. Thus, it starts with a duty cycle of 100 * (1000/6000), or about 16%, and goes up to 100 * (10000/15000), or about 67%. The second loop goes the other direction. Your motor should start slow, speed up, slow down again then repeat the cycle until you press a key.
Problems, comments, ideas? Please Let me know what you think
Copyright © 2001, Joe D. Reeder. All Rights Reserved.